TrustedBarber is reader-supported. If you buy through links on this page, we may earn a commission from Amazon at no extra cost to you.
The disconnected undercut is one of those haircuts that looks effortless when it is styled right and unfinished when it is not. Joe from BluMaan just posted his updated routine for it, filmed with no edits so you can see the entire process. His focus this time: better volume and a style that lasts longer than his previous technique. Here is the routine.
Always start with damp hair
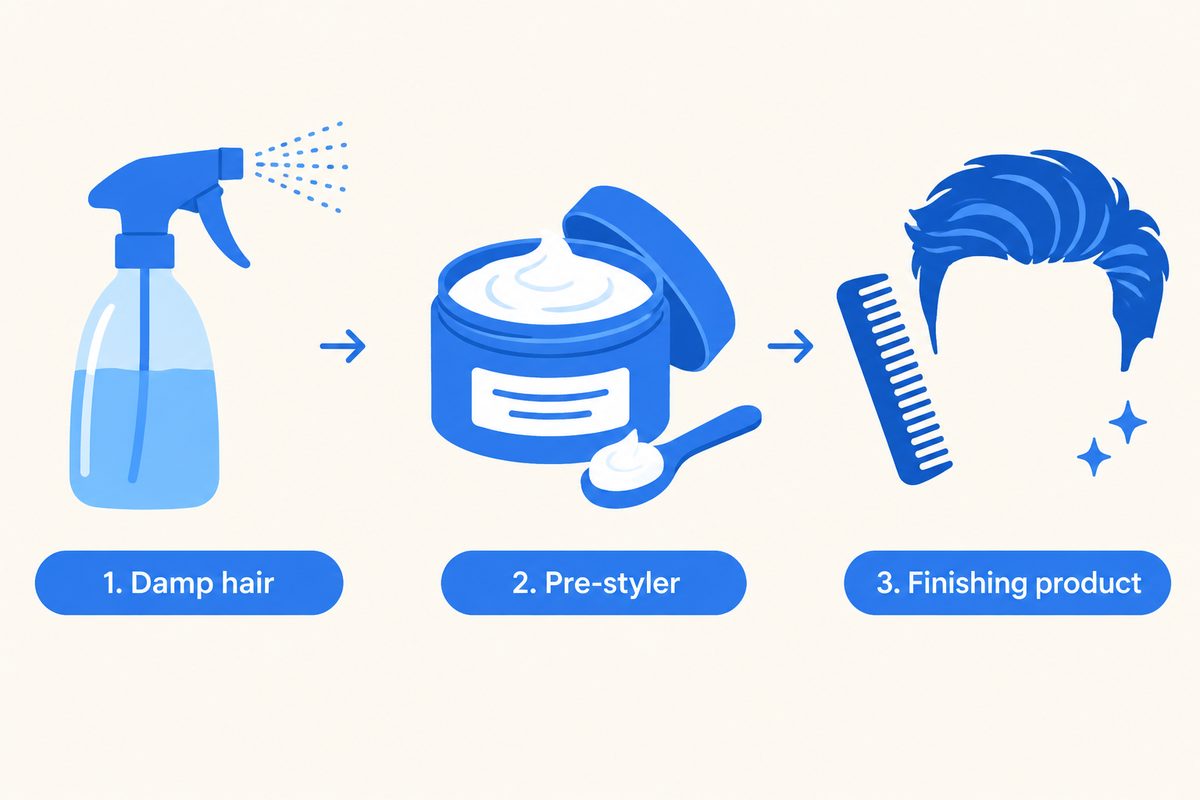
Joe starts every single hairstyle the same way: damp hair. Not dripping, not dry. Damp hair is what lets the first product spread evenly and do its job, and he is explicit that this is the best way to start any hairstyle, not just the undercut. If you have been styling bone-dry hair and fighting it the whole way, this is the fix.
The foundation: pre-styler
On damp hair, the first product in is a pre-styler. Joe uses Original by BluMaan (Styling Meraki), his own line, and the reasoning applies to any pre-styler you choose: it sets the foundation for the finished style. A small scoop, emulsified between the palms, worked through the damp hair. What it buys you is a real amount of hold and control before your main product ever goes in, and it sets the hair in place so the style has something to build on.
His own reason for never skipping it is blunt: without the pre-styler, his hair is really poofy. If your hair puffs up and loses its shape no matter what you put in it, that is the exact problem this layer solves. Whichever pre-styler you pick, it is the step most home routines skip.
Check Original by BluMaan on Amazon
What changed in the updated routine
Joe has taught this hairstyle before, and he is upfront that the haircut itself has not really changed. What changed is the technique. He re-filmed the routine with no edits, start to finish, because in his view the updated approach beats his older version on two specific points: better volume and a style that lasts longer.
That is worth noticing if you tried a routine like this in the past and got a flat result by midday. The products are similar; the difference is in how the layers are built, with the pre-styler doing the structural work and the finishing product sealing it.
Lock it in: finishing product
The pre-styler is the foundation, not the finish. Joe’s routine layers a finishing product on top, and that second layer is what makes the hairstyle last. His updated technique is built around exactly this goal: better volume and a longer-lasting result than the version he taught before. The one-two of pre-styler plus finishing product is the whole system; either one alone leaves hold or longevity on the table. A medium-hold cream like the Cremo Barber Grade Hair Styling Cream is an easy finishing pick for this cut.
Check the Cremo Styling Cream on Amazon
If it won’t stay back: check the cut first
Sometimes the problem is not the routine, it is the haircut underneath it. Stephen Marinaro, the licensed cosmetologist behind TheSalonGuy, demonstrates the two sectioning mistakes that no amount of pre-styler can rescue. The first is an undercut sectioned too low: because the hair above the line is too heavy and sits past the curve of the head, gravity keeps pulling it forward, and it will not stay slicked back no matter what you put in it. The second is the opposite, sectioned too high, which leaves half the head looking shaved and takes months to grow back.
His fix is a landmark, not a measurement. Section the hair at the corner of the head, in line with the corners of your natural hairline. From that height, he shows, the top hair falls back on its own and actually wants to stay back, because the shape of the head is working with the style instead of against it. If your undercut fights you every morning even with pre-styler and a blow dryer, that corner-of-the-head check is the first thing to look at before changing a single product.
Length is the other half of it. In his slick back undercut tutorial, TheSalonGuy deliberately keeps the front long, warning that cutting it too short ends the style before it starts, and he works a dry wax through the hair before blow-drying for workability. That is the same pre-styler logic as the routine above: product in first, heat to set the direction, finishing product last.
Video credit: TheSalonGuy on YouTube.
The products, up close
Original by BluMaan (Styling Meraki). Per its Amazon listing, Meraki is a matte-finish, high-hold hair wax built for all hair types, sized at 2.5 oz. The listing positions it for double duty: use it as a pre-styler for volume or as a post-styler for all-day hold. In this routine it plays the pre-styler role, which is where the matte, high-hold character does the most work.
Cremo Barber Grade Hair Styling Cream. The listing describes a barber-grade cream with medium hold and medium shine in a 4 oz tub. Medium hold is the right register for a finishing layer here: enough to lock the style the pre-styler built, not so much that the top turns stiff and loses the volume this routine is built around.
Watch the full routine
Video credit: BluMaan on YouTube.
FAQ
Why does my undercut keep falling forward?
Two possible causes. In the routine itself, BluMaan’s answer is a pre-styler on damp hair, blow-dried into shape before any finishing product. But if no product keeps it back, TheSalonGuy points at the cut: an undercut sectioned too low leaves hair heavy enough that gravity wins, and re-sectioning at the corner of the head is the real fix.
Where should the disconnected line sit?
At the corner of the head, level with the corners of your natural hairline. That is TheSalonGuy’s landmark for a disconnect that slicks back and stays back; lower falls forward, higher looks over-shaved.
What is a disconnected undercut?
An undercut where the long hair on top meets the short sides with no blended transition. The contrast is the point, and it is also why the top needs deliberate styling to look finished.
Should styling product go on wet or dry hair?
Damp, per Joe’s routine. The pre-styler goes into damp hair so it can spread evenly and set the foundation; the finishing product layers on after to lock the style in.
What does a pre-styler do that regular product does not?
It works as the base layer. In Joe’s routine it adds hold and control and sets the hair in place before the main product goes in, so the finishing product has structure to build on instead of doing all the work alone.
Does this routine only work for an undercut?
No. Joe’s damp-hair start is his rule for any hairstyle, and the pre-styler plus finishing product layering applies anywhere you want volume and hold that lasts the day.