Barber pick
Equinox Professional Razor Edge Thinning Shears. the shears that blend bulk without leaving notches.
<
The do-not list here is the one hairstylist Brad Mondo breaks down in his DIY thinning-scissor video below (watch it here).
Video: Brad Mondo on YouTube
h2>What Thinning Shears Actually Do
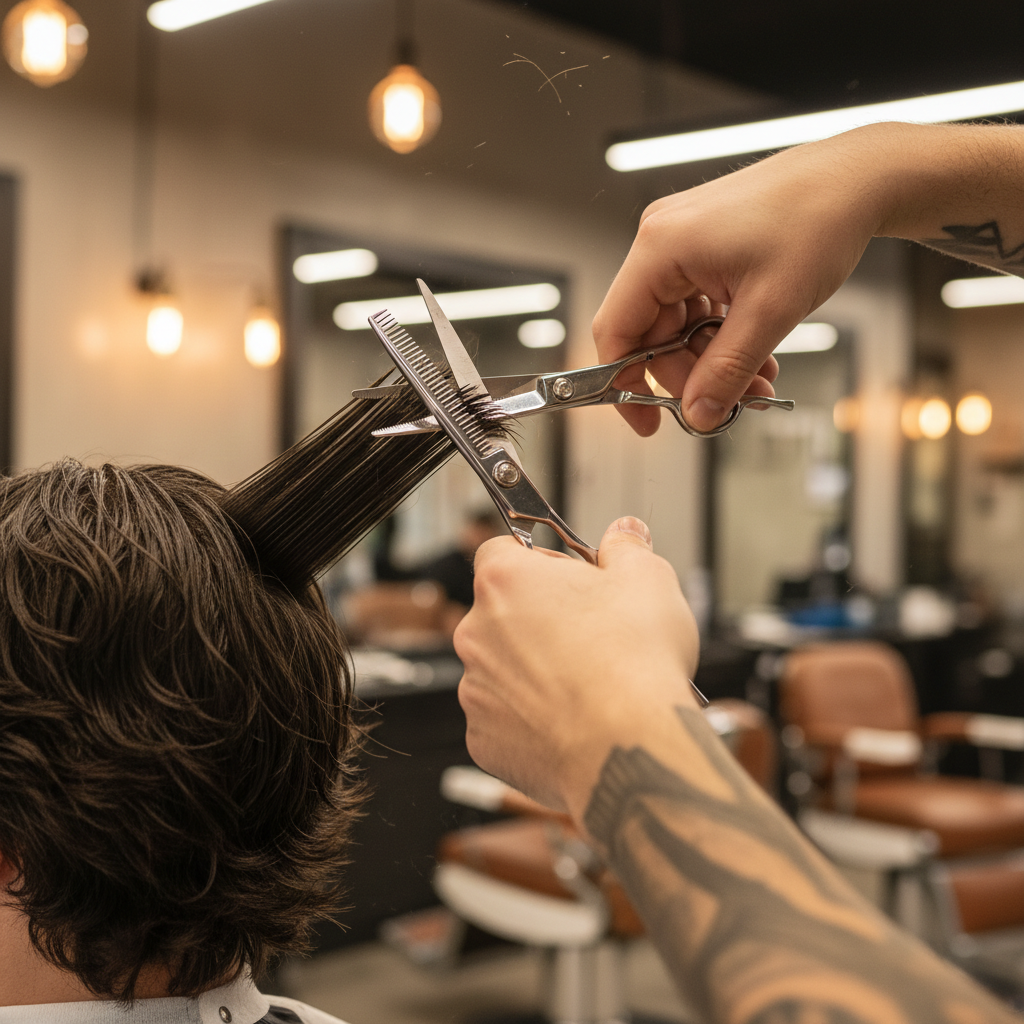
Thinning shears look like scissors that lost an argument with a comb: one blade is a normal edge, the other is a row of teeth. When they close, the teeth grab and cut a fraction of the hair inside the bite while the rest slides through untouched. That is the entire mechanism. Thinning shears do not cut a line; they remove density in a scattered pattern, which is why barbers reach for them any time a haircut needs to lose weight without gaining a hard edge.
The number stamped on the toothed blade tells you the ratio. A 30-tooth shear on a typical 6.5-inch frame removes roughly one strand in three per bite. Higher tooth counts remove less per bite and blend more gently; fewer, wider teeth remove more and texturize harder. Blending shears (the fine-tooth ones) live between those extremes, and a well-stocked station usually holds both.
When a Barber Reaches for Them Instead of Clippers
Clippers cut lines. Scissors cut lines. Thinning shears cut gradients, and gradients are what make a haircut look grown rather than built. The moments they earn their spot:
- Blending a guard line. After a clipper cut, the boundary between a number two and a number three is a visible shelf. A few open bites with thinning shears along the transition scatter the line until it reads as a fade.
- Removing bulk from thick hair. A dense head of hair can look puffy even when the length is right. Internal thinning pulls volume out without shortening the silhouette.
- Softening a fringe. A blunt-cut fringe on straight hair sits like a wall. Thinning the ends turns the wall into texture.
- Finishing fine hair. On fine hair, chunky texturizing shears leave notches. Fine-tooth blending shears are the gentler tool, and many barbers skip thinning entirely on very fine hair.
Our guide to straight versus thinning shears and length choices covers how the two tools divide the work on a professional station, and the tooth-count differences to know before buying either.
The Four Moves That Do 90% of the Work
1. Point cutting the ends
Hold a small section of hair between your fingers with the ends exposed, angle the thinning shears into the section at roughly 45 degrees, and snip into the last half inch. This chips the ends at random lengths, which is what removes the blunt, helmeted look from a freshly trimmed perimeter. It works on almost any hair type and is the first move every barber teaches.
2. Internal texturizing
Open the shears, slide the teeth into the middle of a section an inch or two away from the scalp, close once, and move to the next section. Done across a whole area, this thins the interior while the outer length stays intact. The rule barbers repeat in every tutorial: work in small sections and err light, because a heavy bite cannot be undone, and hair you removed today does not grow back to fix your mistake before the client’s next appointment.
3. Softening a perimeter or hairline
Along the nape, the temple points, or a fringe line, single gentle bites with the tips of the teeth break up the hard edge a scissor or clipper leaves. This is the move that makes a home haircut stop screaming “home haircut,” and it takes about thirty seconds.
4. Transition blending
Where a long section meets a short one, sideburns into a beard, top into a fade, layers into a base cut, hold the section taut and let the teeth chew the junction lightly from both sides. The two textures meet in the middle instead of abutting.
The Mistakes That Ruin Hair
- Over-thinning. The classic amateur error. Because thinning shears scatter their cuts, the damage shows up days later, once the hair dries and settles, as a thin, stringy patch. Take one pass, style the hair, and judge it after a day before any second pass.
- Cutting wet hair too aggressively. Wet hair clumps and hides density, so a bite that looks modest on damp hair can be severe once it dries. Barbers who thin wet hair use lighter pressure than they think they need, then re-check dry.
- Using them near the scalp on short hair. Thinning shears are designed for length. On a short cut they chop random holes instead of texturizing, which is why barbers switch to clippers or the Wahl Peanut for short work.
- Sliding instead of closing. The teeth need to close on the hair, not drag through it. Dragging bends and snaps strands without cutting them cleanly, and the frayed ends show up as frizz.
A Pair Worth Owning
Most of what separates an entry-level shear from a premium one is steel and edge retention. For occasional home use, a Japanese stainless steel pair with a comfortable handle does the same work, as long as the teeth are sharp and aligned. The Equinox Professional Razor Edge thinning shears are the pair thousands of home users and student barbers buy first, with a 4.6 star average across more than 6,000 ratings, an Amazon’s Choice badge, and a price that leaves room in the budget for the rest of a starter kit.
Treat them like scissors, not like garden tools: cut hair only, wipe the blades after use, put a drop of oil at the pivot monthly, and store them closed in a case. Dull thinning shears are worse than dull scissors, because folded hair in the teeth turns every bite into breakage. When the teeth stop gripping, it is time for professional sharpening or replacement, not more pressure.
Practice Before You Perform
Take an old wig, a doll’s head, or, more realistically, a single small section at the nape of a cooperative friend, and practice the four moves until the bite feels automatic. Our walkthroughs of cutting hair with scissors and the clipper over comb technique cover the scissor-side fundamentals that thinning work sits on top of, and the crew cut walkthrough shows where thinning shears finish a classic short cut.
Reading Growth Before the Teeth Touch Hair
Professional thinning work starts with a read of the head, not the shears. Whorls at the crown, double crowns, and strong growth patterns behind the ear decide where thinning helps and where it backfires, because a scattered bite against a whorl shows as a permanent frizz patch that grows back the same way every time. Barbers part the hair dry, look at the flow, and plan bites to travel with the growth direction rather than across it. At home, the equivalent step is a five-second look before you cut: comb the section flat, see which way the hair wants to lie, and keep your bites parallel to that flow.
What to Tell the Client After the Cut
Because thinning shears scatter their cuts, the finish changes over the next 24 hours. Hair that was thinned wet relaxes as it dries and settles lower, so barbers who do heavy thinning work tell clients to expect a slightly softer look on day two, and to come back sooner rather than later if a section reads thin. The practical takeaways for anyone doing this at home: do not judge the result while the hair is still wet, and never follow a “looks thin already” instinct with a second pass the same day.
The Cautionary Tale: What DIY Thinning Actually Looks Like
Nothing sells professional restraint like watching an amateur skip it. The video embedded above is stylist Brad Mondo reacting to a real DIY haircut built largely on drugstore thinning shears, and it is a working catalog of every failure mode in this guide. His opening framing: “thinning shears can ruin your haircut if you don’t do it right,” and thick-haired DIYers “overdo it and it gets really bald.” Within minutes the video proves him right. The sections are taken in the wrong places, the shears keep going back over hair that already lost its bulk, and by the end the cut “is going to lay nicer, but it’s going to be paper thin on those ends” which is the exact trap: it can look acceptable while it is standing, then collapse the moment it is washed and worn.
The tools themselves matter as much as the hands. Mondo’s first read on the cheap drugstore pair in the video: “I think they look like the most dull scissors you can possibly use… like paper cutting scissors.” Dull thinning shears do not slice; they crush and tear the hair, and the frayed ends that result split within weeks. The thinning shears we recommend exist at that price point for a reason: sharp teeth, matched tension, and edges that cut instead of chew.
His one hard rule from the video is worth writing down: “You really want to cut like halfway down your head when you’re going to use thinning shears or you’re doing any kind of thinning method.” Thinning near the roots leaves the cut flat and wiry on top; thinning right at the ends destroys the hemline. The middle third of the strand is where bulk lives and where the teeth belong.
Why Damaged Hair Changes the Math
The hair in the video is bleached, over-processed, and already breaking off in patches, and Mondo’s verdict is the one that matters: “I just wouldn’t use a thinning shear on her hair.” On compromised hair, every tooth of a thinning shear is a guillotine for a strand that was going to snap anyway, because the shear cuts a fixed percentage out of every section it passes through, including the weak ones. Healthy hair sheds that risk; chemically treated hair banks it.
The pro alternative on fragile hair is smaller tools doing smaller jobs: regular scissors point cutting into the ends, which the DIYer in the video actually does correctly (“taking off an itty bitty bit of hair off of her ends by point cutting into it, which is totally fine”), and internal removal done a strand group at a time rather than a full pass. If your hair has bleach, keratin, or breakage anywhere in its recent history, tell your barber before they reach for the thinners. A good one will switch techniques without being asked twice.
Frequently Asked Questions
Can thinning shears be used on curly hair?
Yes, and curly hair is where they shine, because curls hide cut lines beautifully. The caution is volume: curls spring back shorter when dry, so thinners should work on dry or nearly dry curly hair, lightly, or the texture collapses.
What is the difference between blending and texturizing shears?
Blending shears have more, finer teeth and remove less per bite, which makes them safe for fine hair and finishing work. Texturizing shears have fewer, wider teeth or chunky notches and remove more, for building visible separation in dense hair.
How often should thinning shears be sharpened?
Home users get years out of a quality pair. A working barber sharpening service typically runs on a schedule of months, not weeks, driven by how the teeth start folding rather than cutting. Feed resistance and frizz after bites are the tell.
Can I thin my own hair?
The back of your head is where self-inflicted disasters live. Thin what you can see straight-on, in good light, one light pass at a time, and leave the nape to a mirror-and-patience session or a professional.
Where on the strand should thinning shears cut?
The middle lengths, roughly halfway down the head. Cutting near the roots flattens the style and leaves short wiry pieces on top; cutting at the very ends shreds the hemline. The mid-strand is where the bulk actually lives, which is why Brad Mondo’s rule in the video above puts the teeth there.
Can you use thinning shears on bleached or damaged hair?
It is the worst-case pairing. Thinning shears remove a fixed slice from every strand they pass, and compromised hair breaks where healthy hair would survive the cut. The video above documents exactly that combination going wrong. On damaged hair, pros switch to point cutting with regular scissors, which removes less per pass and keeps the ends intact.
Do cheap thinning shears work?
Not the very cheapest. Dull or loosely machined teeth crush hair instead of slicing it, and the frayed ends that result split within weeks. In the video above, the stylist’s immediate reaction to a drugstore pair was that they looked like paper-cutting scissors. A mid-range pair with real steel and matched tension is the floor for anything touching a client’s hair.